Wednesday, April 30, 2014

I miss you....already!


I've been a bit under the weather for a few days and have not been out visiting my friends in blogland much - I hope to get back to normal soon.  I wanted to make a card today for my business partner and friend, Diane : )   She is going on a vacation this week and I miss her already! LOL 

I am sure I am not jealous that she is going to a sunny warm climate and we have snow in the forecast all week! eeek!! I know it is because she is such an important part of our lives we feel the void when she is gone!  BUT!! we are happy for her - so here is a happy tropical looking card in her favorite color!

Go and have a blast, Bella, but get back here soon!! (((Hugs)))

Patti

Supplies:
Patterned paper from American Crafts (that does not seem to have a name)
Sentiment from PTI Flower Fusion #6 Stamp Set

Monday, April 28, 2014

Hello Friend


My card today is a good one for welcoming two new friends to my follower list! : ) I am please to introduce Jen Zeeb from Stamplified blog and Greta from GG Creations blog both talented paper crafters. Please drop in on these gals and leave some love! : ) be sure to tell them Patti sent you : )

So.... how much paper does a girl really need?? I have so much paper it is shameful! and yet when I was walking through my LSS recently I happened across this cute paper and "had" to have it! LOL  It is by Pebbles called "Ring Ring".  I pictured a card just like this in my head while I was still in the store - and here it is : )

I started with a piece of solid cream cs from The Paper Cut and embossed it with my Circles Cover Plate by PTI.


 I mentioned having tried this technique on my card yesterday but the embossing was a bit too light to show up in the photo.  I tried it again adding another piece of cs as a shim and it turned out much better.  The embossing is deeper and shows up nicely.  I think it is a great value to be able to use die cuts as embossing simply by altering the "sandwich" that goes through your die-cutting machine!

I cut out the telephone dials from my new Pebbles  "Ring Ring" paper and added a sweet telephone die cut from PTI. The sentiment is actually part of a "Girl Friend" stamp from Crafty Secrets "Sew Special " stamp set. The patterned paper on the bottom section of the card is the reverse side of the telephone dials pp.

Hope you like it and I hope you have a wonderful Monday! It is a bit cloudy and gloomy here in northwestern Wisconsin but ah! the snow is gone (for the most part) and spring truly is in the air!

Thanks a bunch for cheering me on with your comment today.  Just by leaving a comment you qualify for a chance to wind my BLOG Candy!! Click HERE for all the details!

BIG (((Hugs)))
Patti

Supplies
cs from The Paper Cut
Patterned Paper from Pebbles "Ring Ring"
Telephone die cut from PTI
Sentiment from Sew Special by Crafty Secrets


Sunday, April 27, 2014

Thinking of You

My challenge is going well.  Today's card will be my 24th. : ) So... not so bad right? I have 80 days left to make 76 cards... eeek! should I be nervous!??!

If you have not heard I am offering BLOG CANDY.  All you need to do to have a chance to win is comment on today's post! Easy peasy!! Click HERE for all the details.

Before I share my card today I want to welcome two new followers.  Jen from I Create blog and Michelle from My Passion for Crafting.  These girls have style!! Jen is not only a talented paper crafter she is also funny : ) and a DT member of  Freshly Made Sketches, one of my favorite challenge blogs.  Michelle's has a clean fresh Trendy!! style : ) I know you'll enjoy visiting both these great blogs. 

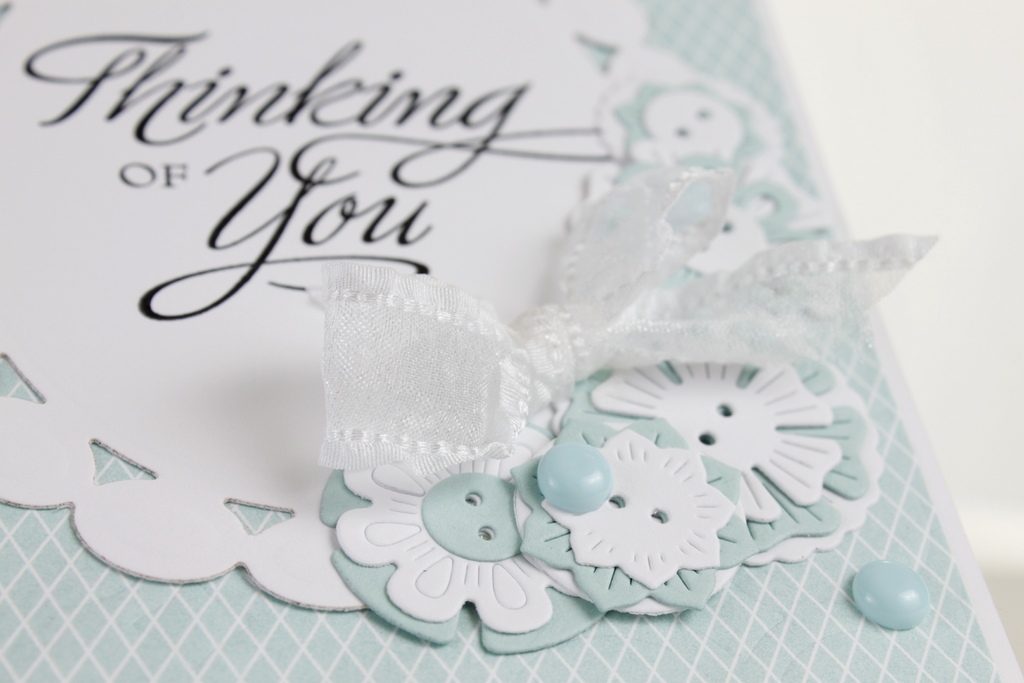
I have been wanting to play with my new Button Stacks from PTI.  These wonderful button die cuts make for some sweet embellishments.  I started with a piece of Stampin Up's "Sent With Love" DSP for my background paper.  Even though it is not showing up in my picture - I embossed it with a PTI cover plate.  As this was the first time I ever tried embossing with a cover plate I was nervous that I might actually cut instead of emboss so my embossing is very light - too light. But it is visible in real life : )


Are you loving the buttons as much as I do?? In the "supplies" listed below I will leave the link to each button die I used to make your shopping easier *wink*

Did you notice the Darling little enamel dots!?  I'm pleased as punch with how nifty these little cuties are!! I made them : )  Julia Aston of Create with Me blog shared how to make them in THIS POST.  Then Kelly Bertram from Kelly's Place shared that she needed to reduce time and temperature in THIS POST.  So obviously ovens vary because I melted my Perler Beads on 325* for 30 minutes.  I guess the bottom line is start low and raise both temp and time until the little beads are melted the way you want them.  It could not be easier to do!!

I paid $3.25 for a pack of 1000 pastel beads! Have you priced the Enamel dots recently? this is a very good way to use a trendy embellishment on your card for just pennies : )

That's it for today.  I hope you have a wonderful Sunday!! Thank you so much! for your comments they really do make my day!

(((Hugs)))
Patti

Supplies:
Solid cs from PTI
Patterned paper from SU "Sent With Love" DSP
Cover Plate used for embossing my pp is "Circles" from PTI
Button dies used: Buttoned Up #1, Buttoned Up #2, Button Stacks  and Button Stacks II
Oval frame by Spellbinders
Sentiment by CTMH "Card Chatter- Sympathy"

Friday, April 25, 2014

Papertrey April Blog Hop Challenge

Yeah!! time for another Papertrey Ink Blog Hop!!  Here is the challenge:


"If you take a look around, you can find inspiration in nearly anything!  This month we challenge you to look at embroidered patterns in a whole new light!  Look through your clothes, Pinterest, home decor catalogs or even the inspiration I have provided above and find an embroidered pattern that speaks to you.  Using the colors and design of the embroidery, build your own stamped version using your favorite floral stamps or other images.  No stitching required!" 

Searching Pinterest for "Red Work Embroidery" I found this inspirational design -

Design by Rosalie Quinlin
Red Work is among my favorite embroidery styles. It is a style of decorative needlework that consists of embroidering the outline of designs onto a white or off-white background with a contrasting color thread (usually red). It reminds me of my Grandma and my Mother-in-Law and my sister Beverly Ann.


I just can't wait to see what our fellow paper crafters have created in response to the hop challenge.  I love embroidery!! If I had the time I would create embroidery inspired cards all day long! LOL


Thank you for leaving a comment on my blog today.  In doing so you are automatically entered in a drawing for the chance to win my BLOG CANDY!  Please see THIS POST for all the details.

Have a wonderful day!!

Patti

Supplies:
Card Stock by Papertrey Ink
Doodlie-Do Stamp set by Papertrey Ink
Heart shapes cut with Spellbinders dies

Thursday, April 24, 2014

Make It Monday... Darnell made me do it!


I was really intimidated by this weeks Make It Monday simply because I don't have very many ink pads and the ones I have do not really match each other but Darnell posted two totally beautiful cards (see one of them HERE) and I just couldn't resist trying this technique.

I created two water colored pieces because the first one was just too controlled so I tried again.  Other than the large splat in the lower right I kind of liked it.  Still not thinking I would really make a card from it I decided to spritz it with a slight mist of water.  As it all dried and kind of developed then the wheels started tuning and I thought of this great sentiment from PTI and how sweet it might look positioned over the white splat.  I never thought it would turn out this good.  : ) so I decided to go ahead and join the challenge even in the shadow of some GREAT! papercrafters!! You gotta check out what others have created HERE.

I am giving away BLOG CANDY! on July 16th. All you have to do to have a chance to win is comment on today's post!  Click HERE for all the details : )

I hope you will consider joining this challenge it really is a lot of fun : )

Patti

Supplies:
Card Stock from SU
Island Indigio - Pool Party and Crumb Cake ink from SU

Sentiment from Movers & Shakers stamp set by Papertrey Ink

Wednesday, April 23, 2014

Hello, you

Check out this great work space! it belongs to my newest follower, Nikki.  Welcome Nikki  : ) great work space!! No wonder you are so creative!!

BLOG CANDY up for grabs : ) to have a chance to win simply comment on this post.  For all the details please follow THIS POST.


My card today is based on this week's Freshly Made Sketches.  I'm really getting in on this one early so there is plenty of time for you to join us.  I would love to see how you interpret this sketch!

I have been wanting to try this beautiful technique from Maile Belles.  when I saw the Freshly Made Sketches sketch today I thought of Maile's divided panels idea and thought I would incorporate that technique into my card.  Epic failure! LOL so I re-grouped and came up with this card - which I kind of like! :)


I cut my base card from white cs then cut a smaller piece from SU's Island Indigo.  Next I cut another piece of white cs (slightly smaller than my card face) and cut out a 4" circle from it.  Setting the circle piece aside to be used for a future project I stamped all over the card face using PTI's Doodlie-Do stamp set.  I stamped the images with Island Indigo Ink sometimes "stamping off" two or three times.

Once I realized that I could not simply reposition my cut out circle piece as Maile did with her rectangle - I cut a 3.5" circle so that the pretty Island Indigo paper would show from beneath. 

If I were to create this card again I would apply the chevron  die cut over the white cs before cutting my 3.5" circle and then cut it all together but this time I did it after the fact so I had to run it back through the Big Shot to cut the circle again and trim those chevron pieces to fit the circle exactly. Finally I trimmed off the left side and attached it to the card.

Next, as the sketch shows there is a ribbon or banner piece to be added vertically.  Not wanting to cover my cute chevron circle LOL I decided to cut the banner from Velum. 

Finally stamped my sentiment from SU's Regarding Dahlias stamp set.

Well! 21 cards done in my personal challenge to complete 100 and 82 days left to go!! woowhoo Thank you for all your encouraging comments keep them coming for more chances to win : )

Have a great evening.

Patti


Tuesday, April 22, 2014

Sticky Wishes

I am giving away BLOG CANDY! on July 16th. All you have to do to have a chance to win is comment on today's post!  Click HERE for all the details : )


Today's cards are two super easy Birthday cards using Cardstock Stickers from Karen Foster Designs as the main element on the card.


Nothing elaborate just simple and sweet : )

Thanks a bunch! for looking. I hope you will leave a comment for a chance to win my BLOG CANDY!

Have a wonderful day!!

Patti

Supplies:

Solid cs by SU
Yellow floral patterned paper from Heidi Grace Designs
Cardstock Stickers by Katen foster Designs
Teal Chevron Cover Plate by PTI
Happy Birthday sentiment by PTI "Movers and Shakers Sentiments"
All other supplies from the scrap bin

Sunday, April 20, 2014

Happy Easter


Before I start my post today I would like to welcome my newest followers, Brenda from Creativity is only a State of Mind and Shaz from Simply Shaz.  Thank you so much for following, girls, I hope you will find some inspiration while visiting me in my piece of cyber space.
 

Not Easter candy that disappears and makes you have to run an extra mile on the treadmill but... BLOG CANDY : )  For a chance to win simply comment on this post.  See all the details HERE.


Here is a celebration of Easter card for a special friend of mine.  The inside reads: 

Jesus is risen just as He said!


I think it is the color combo that makes me love this card so much.  No matter what the reason I created another one almost the same. 

I hope you enjoy a wonderful celebration of Love and Joy and Hope in Jesus!

Patti

Supplies:
Pink Pirouette patterned paper from SU "Twitterpated" Designer paper Series 
Solid cs SU
SU Quarterfoil embossing folder
Flower image from CTMH
Birthday sentiment by The Angel Company
Celebrate from PTI Birthday Classics: March Stamp Set 
Jesus is risen sentiment was computer generated

Saturday, April 19, 2014

Vintage Thank You

Put your hands together and welcome my newest follower.... Diane Larson : )   Hi Diana.  I invite you to visit her piece of blogland at the DL.ART blog : ) When you do be sure to leave some love!!


BLOG CANDY! All you have to do for a chance to win is comment on today's post.  See THIS POST for all the details!!
 Imagine my surprise when my husband brought in a plain brown box from the mail box last week.  It was from one of my sister-in-laws and it was not expected!! I excitedly opened it to find this remarkable gift! For NO reason!!


Isn't it beautiful!? a tea mug with cover for the top plus a tea strainer that sits inside the cup all wrapped up in this beautiful round box!! I was so blessed!! She would say the reason she gave this gift to me was because I sometimes share my papercrafting supplies with her -  but ladies! this is WAY more than anything I have given her!!  Thank you, again, Kay - my cup overflows! : )

Because she loves papercrafting as much as I do I wanted to create a thank you card that was very special. 
I attempted to copy the postcard and butterfly design that is on the mug.  I do not own a beautiful butterfly stamp like the one on the mug so I went to my scrap bin where I recall once using a butterfly paper.  

Every bit of my card is from my scrap bin with the exception of the postage stamps on the lower left of the card and the inside of the card.  Those were from my bulging sticker tote : ) 


I was excited to read this weeks challenge at "Tuesday Throwdown":

Vintage / Shabby Chic with Ribbon or Fiber.  Create a vintage card or project and add ribbon or fiber to it. 

 Seemed like a very good fit to me : ) so I will enter this card in that challenge! I am fairly sure this will be my first time to enter. If you are not too busy chasing bunnies this weekend I encourage you to join this sweet challenge.

My card making challenge is  not hard yet : ) I think I often make a card a day - what has been harder is posting the cards and getting out to meet new friends and say hi to my peeps and new followers.  Time is sometimes short.  I say this to emphasize how very much I appreciate the time you take to cheer me on! I know there is so much to see and do in blogland and it means a lot to me that you take the time!

This is my 17th card and "only" 88 days to go!! 

Have a wonderful day!

Patti 

Supplies:
Scrap paper
Cuttlebug dual die cut/embossing folder for large butterfly
Martha Stewart punch for small butterfly
Brown pearl gems from CTMH
Unmarked piece of ribbon from the scrap bin

Friday, April 18, 2014

Hey Partner!

BLOG CANDY! I am challenging myself to create 100 cards in 100 days : ) Win my candy simply by commenting today!  See THIS POST for all the deets!  I have 84 cards left to complete in 82 days!


Today I have a simple card.  I'm not sure if it qualifies as a CAS card ... I guess I wonder that because it is a darker color LOL but clean and simple it is.  I used some Yummy! papers by My Mind's Eye called "Sunshine "Lovely" Plaid Paper as well as some solid Chocolate Chip by SU and a little bit of scrap paper.


My sentiment is an old old stamp from The Angel Company.  I created my little buckle from a Quickutz die and my star is from Spellbinders! easy peasy.

Oh and the woodgrain embossing folder is by SU. Speaking of that ... is it me or does your Woodgrain folder from SU cut way too deep?  I can't run it through my machine with a normal sandwich configuration - it is really sensitive!  

I can't thank you all enough for all the comments you've been leaving to cheer me on in my challenge ; ) Carole you are right you gals are definitely! my cheering section I can see the pom pom's waving! LOL 

That is it for today! I hope this finds you happy in your heart and getting inky!!

Patti

Thursday, April 17, 2014

Make It Monday first there was one then there were four!

Before I start my post today I would like to welcome my newest follower, Paula owner of Precious Pages by Paula.  Thank you so much for following, Paula, I hope you will find some inspiration and a few giggles!! Please check out Paula's blog and tell her Patti sent you : )

CANDY anyone?? Please see THIS POST for all the details on how to win my blog Candy : )

 Erin Lincoln is one of the best designers out there right now as far as I'm concerned! Check out her blog "Procrastination Station" she truly is a gifted paper crafter. If I lived near her I would stalk her and try to bribe her to be my friend.  She is funny and playful and just... normal (in a good way!) LOL  Take this week's "Make It Monday" video.  Erin creates an amazing card giving helpful design and tool tips along the way - all the while you hear the voices of her kids playing in the background - I'm guessing it was her kids.  She doesn't fall apart like a cheap suit because she is being watched WORLD WIDE : ) and the kidos are making a little noise - she doesn't even seem to notice! I love it!! See what I mean? who wouldn't want to be friends with a gal who can work at home with such grace and style and talent!!!

Erin challenged us to create a card using heat embossing and two step stamping - then! cut out with a coordinating die.  She shows in THIS VIDEO the most amazingly easy way to handle these tiny dies.  My card is an A-2 size card and look at all the space I have around my EMBOSSED die cut flowers! The die cut is teeny but with Erin's suggestion it was a breeze.... ok a slight wind.


I admit I did have a few problems but I perservered and after only 2 or 3 hours! I had a card I liked so much I decided I better make two : ) It may be a "slight" exaggeration how long it took me. heehee

I like to decorate the inside of my cards too so I inked up the flower stamps and built myself TWO insides - because you remember now I have two of these cards made.  Well! much to my surprise when I went to tape my inside to the card I had stamped the flower in the wrong orientation! grrrr!!  

Part of my personal challenge to myself is to USE my stuff.  I just could not bring myself to toss them out so two more cards were born!!


And I think they are pretty darn cute! : )  I had completely run out of time so I did not heat emboss or layer the die cut but, even though it is not showing up well in my picture, I ran a zig zag stitch to attach my ribbon. : ) There are also a trio of sequins to complete my TRIANGLE! thanks for the tip, Erin!!


So one simple silly little card took all afternoon and turned into four cards - which is not so bad at all!! I loved the tips she shared and will no doubt use them again and again.

Please consider  joining the Make It Monday challenge! There is a nice prize too!! : )

These cards make my 12th, 13th, 14th and 15th cards completed in my personal challenge to make 100.  Only 90 more days to go!!!  Thank you everyone who is cheering me on! It's great fun to read all the encouraging comments!!

Have a wonderful day!

Patti

Supplies used:
SU solid cs
Flower Fusion #6 Stamp Set by PTI with coordinating flower die
Stampendous "Detail White" embossing powder
American Crafts green ribbon and tan Baker's Twine


Wednesday, April 16, 2014

Something for Grandma

BLOG CANDY! All you have to do for a chance to win is comment on today's post.  See THISPOST for all the details!!

Color me Happy! I have a new follower!! none other than the amazing Donna  Mikasa of three umbrellas blog!  Please join me in welcoming her!! : )

 I wanted to share this card that I make for my Grandma.  Actually both of my "real" grandparents have been gone for many many years but this dear 93 year old woman is a Grandma to many many people.  She is full of love and live and loves Jesus more than anything.  She is spry and healthy, lives on her own, and is one of the most remarkable women I have ever met. : )

I started with bright yellow cs from SU for my card base.  Next I cut a shape from the SU "Lattice BigZ" from the patterned yellow and white paper.  I glued it securely to a piece of white cs. Then I embossed it with a Anna Griffin embossing folder. ~ This folder is the one I grab most often when I want a vintage look or a quilted look.  One thing I LOVE about this folder is the size! It is 5 x 7" and has the opening in the top of the folder so you can slide your cs out the top for a continuing design if you need a longer piece.  Brilliant!! : )   Ok, I digress.... next I attached my white, embossed, cs to the yellow base and then added another shape from the same "Lattice BigZ" that I had carefully applied small foam tape to the back of..

I cut a couple of white "banners" and stamped my sentiment -the inside reads "Easter". Finally I attached a piece of pretty yellow ribbon and a pearl : )

The design for this card was based on the Unscripted Sketches challenge for this week. 


I switched things around a bit but according to the rules I think this is ok.  Loved the sketch!! Please consider joining this challenge which is made even more fun because it is the 5th Anniversary celebration of this great blog and there are even prizes : ) 

I guess I better get busy I have spent hours, literally, trying to get this post complete.  I had a very difficult time uploading my picture for today's post.  I actually started last night and found when I brought the picture in it was a hideous dark greenish brown color.  I tried several things before I called my hubs to take a look and we learned that in order to fix it I would be forced to join Google+ arrrr!! Oh how I wish I had selected a different blog hosting site in 2007 when I started my blog.  I don't think this picture still looks right but it is "ok" so I will continue to see if I can find out what is causing the remarkable change from how my pictures look in Photoshop until they appear on my blog. I prefer cardmaking to technology! LOL

Thank you so much for leaving a comment.  Please come back every day as with each comment comes another opportunity to win my BLOG CANDY!! : ) 

Have a great day!

Patti

p.s. guess what we are getting right now?....... 4 to 8 inches of snow!! : (  wahhhhhhh

Supplies.

Solid cs from Stampin Up!
Yellow and White patterned paper from SU International Bazaar Designer Papers
Stampin Up! Lattice BigZ die 
"Lovely" sentiment from PTI "Birthday Classics: February Stamp Set
"Easter" sentiment from PTI "Birthday Classics: April Stamp Set

Tuesday, April 15, 2014

Washi Bunny

 
Starting April 7th I began a personal challenge to create 100 cards in 100 days! For a chance to win my BLOG CANDY!! come visit me each day and leave a comment.  See THIS POST for details.


I CASED the design for this card from the very talented Donna Mikasa.  See her card HERE .  Her card is so much better but I wanted a silly card for a silly friend and I remembered pinning Donna's great design.  I just love the simplicity of the design and the vibrant colored Washi tape she used.  It actually inspired me to begin collecting Washi Tape. : )   Please visit Donna's blog three umbrellas. You will be inspired by her wonderful CAS style.  Please leave her a comment and tell her Patti sent you! : ) 

When you click on the link to Donna's card you will see she had a wonderful pallet of Washi tapes to choose from.  I, on the other hand, own only 12 different tapes and FOUR of them are mostly black! LOL If my friend notices that the bottom portion of the bunny is snowflakes she'll simply write it off to a long winter LOL


I used the cutie patootie image from Papertrey Ink called Hippity Hoppity and cut it out with the coordinating die of the same name.  Even the little eggs are Washi tape covered cs - cut with the Hippity Hoppity die set.


I feel like I'm finally getting my challenge under control.  There were a few days there where I was creating, photographing and posting all after breakfast! LOL I needed to get a bit ahead of the game and I'm feeling much better.  Tomorrow I will have more yellow and a sweet card I created for my 93 year old (adopted) Grandma : )

Thanks a bunch for cheering me on.  It really is working : ) I ONLY have 90 cards to go in 92 days! easy peasy *sigh*

Have a wonderful Tuesday!!

Patti


Monday, April 14, 2014

Giddy Up! Birthday Girl!


Starting April 7th I began a personal challenge to create 100 cards in 100 days! For a chance to win my BLOG CANDY!! come visit me each day and leave a comment.  See THIS POST for details.


 I love this paper!! it is called Giddy UP! by Samantha Walker.  It's two sided - the bottom portion of this card is one side and the top portion has the reverse side of the same paper : ) Love it!! and it is perfect for a friend of mine who is a self proclaimed "Tom Boy" LOL She is only part "Tom Boy" and the other part... loves pink!!

I used the "One Liners: Happy Die" from Papertrey Ink.  Because we are meeting my friend and her husband for dinner I felt the liberty to use some of my chubbiest buttons - knowing it is not going in the mail : ) 

It's a simple card for a simply wonderful friend!! Can't wait to see them : )

This is my 9th card but if you have been keeping track you probably have realized  I've been messing up with my day count LOL I have 93 days left to go.  I have marked my calender now so none of us gets confused *wink*

Thank you so much for stopping by to cheer me on! You are the best cheering section a girl could ask for!! 

Happy Monday!

Patti 

Sunday, April 13, 2014

Paper Piecing


Starting April 7th I began a personal challenge to create 100 cards in 100 days! For a chance to win my BLOG CANDY!! come visit me each day and leave a comment.  See THIS POST for details.

I would like to extend a warm welcome to Helen owner of HandmadeCards by Helen blog and Linda my newest followers.  Linda, if you have a blog would you be so kind as to leave a link so that I can post it link and come pay you a visit!! : )   Check out Helen’s beautiful and bright creations! Her style seems to be inspired by the beautiful state she lives in! : )


 When I saw the challenge this week from the talented gals at "Shopping Our Stash" I knew I was going to have fun!! I especially love the fussy work of paper piecing.  However! I wish I had not waited so long to create my card this week because I've been under the weather today and this card is not my best effort : ( dontcha just hate that!? 

I stamped my basket of eggs on kraft paper and then again on white cs.  I trimmed up my image cutting it carefully up to the basket handle and using an x-acto knife cut out the small area at the top of the handle.  I added a little color o the basket for added dimension.  Next I colored the eggs with prisma pencils and shaded the coloring with Gamsol. I then cut the eggs out and placed them over the stamped image on the kraft cs. Finally adding a little bit of green shading under the image.

For the top part I embossed the pink paper with SU Clouds embossing folder and finally cut a bunny from the PTI Hippity Hoppity stamp set and die combo.  I also paper pieced the cheeks and inner part of bunny's ears. Before attaching it all together I took a "bite" out of the bunny's ear!

This card will go to my Dad and he will think the bite is the best part! : )

This is card 8 - with 92 to go : ) on my way to my personal challenge of 100 cards in 100 days!! : ) Thank you so much for cheering me on! I LOVE reading all the wonderful encouraging comments : )

Have a wonderful Sunday!!

Patti

Supplies:

SU card stock
Eggs and Basket Image by The Angel Company
Hippity Hoppity bunny and die combo from Papertrey Ink
Clouds embossing folder by SU

Saturday, April 12, 2014

April Showers


BLOG CANDY! All you have to do for a chance to win is comment on today's post.  See THIS POST for all the details!!

Before I start my post for today I would like to welcome my newest followers, Dido from Inkyfingers blog alllll the way down in Tasmania - Australia!!( Isn't it amazing how small the world is today) And Kristie from KreativeKristie blog. It is so great to have you! I hope you will find inspiration and a few smiles while you are here.


We are enjoying some April showers today!  We are excited especially because it is helping to melt some of the snow!! Spring is in the air : )   I created this card for a good friend of ours with an April birthday.  We do not have very many friends or family with birthday's in April but I still could not resist this $5.00! stamp set from PTI. I hope to collect every set in this great monthly birthday series.

 Today's card is my take on this weeks "Freshly made Sketches Challenge"  

I have wanted to use my new "Strip Stitch" die from PTI.  Asha, I don't know HOW you do all that stitching on your cards!!! It does take some work LOL.  I stitched all around my die cut and then sewed the "button Stacks" flowers on top. The flowers are faux buttons from PTI.  I wanted to use tissue paper with several layers but I didn't have any tissue paper so I used some coffee filters! It was an even better result than flimsy tissue paper.  I inked every other layer with blue ink and highlighted the centers with a pearl : )

Please consider joining the wonderfully talented group of crafters at Freshly Made Sketches

Thank you for your comment and for cheering me along in my 100 cards in 100 days challenge! SEVEN completed and 93 to go : )

Have a wonderful day!

Patti

Supplies:
Solid cs - SU 
Patterned cs from Imaginisce "Baby Powder*Bubble Bath
Strip Stitch Die - PTI
Flowers - Button Stacks from PTI
Sentiment - Birthday Classics: April Stamp Set PTI

Friday, April 11, 2014

Fishy Wishes for Emma

BLOG CANDY! All you have to do for a chance to win is comment on today's post.  See THIS POST for all the details!!

Before I start my post for today I would like to welcome my newest followers, Manuela from elasdistrict blog and Cornelia from Stempel Spass blog.  I "met" both of these talented ladies through PTI's Make it Monday challenge.  Please check out their beautiful quilts and be sure to tell them Patti sent you : )

Please don't forget to make a card for Emma!If you have not yet heard about the Card Drive - it is for a little girl who is fighting Acute Lymphoblastic Leukemia  Kelly, from Kelly's Place blog has organized a card drive for Emma.  Please follow THIS LINK to read all the details and how you can help!!

I hope to brighten Emma's day when she receives this CRAZY CARD! When she pulls the tab....


there is a surprise waiting for her inside!!

Most people have probably seen this type of "crazy card" before.  The card is folded and secured shut.  The recipient pulls the tab and the inside slides out.  The "crazy" look is that the uncolored fish suddenly appears brightly colored surrounded by friends! : )

I stamped the largest fish on a piece of acetate.  Then I stamped the entire scene on a piece of white cs and colored it.  Next you line it all up so that the clear acetate image and the white cs image line up perfectly.  Then before the card is secured shut you attach a "slider" and wedge a piece of solid white, un-stamped, cs between the acetate and the colored image.  Emma will pull the tab and the only part that will come out is the colored cs and the stampe acette leaving the center wedge in the card base (on the left in this pic) and revealing the Fishy Wishes on the right : ) There is a "stopper" so that the right side of the card is never entirely removed from the card and can easily be slid back and forth many times to keep the fun going!

This card is not included in my count of 100 Cards in 100 Days because I created it before April 7th but I wanted to be sure to showcase it as a reminder that there are still more cards needed for Emma.

I am busy today, though, creating new cards for the coming week's posts.  My personal challenge to create 100 cards in 100 days is well under way and I'm having a lot of fun!!

Thank you for cheering me on!! Simply leave a comment to have your name included in a drawing for a chance to win my BLOG CANDY. : )

Have a great day!

(((Hugs)))
Patti

Supplies used:

Crazy Card from The Paper Cut
Images by SU "Fishy Friends"
Sentiment: "The Angel Company"
Swirls Embossing folder by Cuttlebug
Bakers Twine from Doodlebug Design's Incorporated
Pretty purple bow created using SU 1 3/4" x 7/8" oval punch (scrap paper)


Thursday, April 10, 2014

No-Sew Quilted Cards

BLOG CANDY!!  I am having a little trouble with getting my links to stick today... try looking at THIS POST to see the full details on my Blog Candy : )

Before I start my post for today I would like to welcome my newest follower, Ardyth from MASKerade blog.  She has a wonderful clean and simple style that I am coming to love more and more! : ) Please take a minute to blurf over to visit her and don't forget to leave some love!! All we need is love : ).


5" square card

 My cards today were inspired by the amazingly talented Dawn McVey!  She is a senior design team member for Papertrey Ink.  This week Dawn presented the challenge for Make it Monday. The challenge - to create a "No Sew Quilted" project. This was easy for me as I have done this technique in the past and LOVE the results!  What I have never tried before, though, was to use a PTI cover plate to create my "quilt blocks" I wish it were this easy in real quilt making!! 


 I simply ran some coordinating papers from SU's "Twiterpated Designer Paper series through my big Shot using the PTI hearts cover plate.  Then I cut the "template" that was left after the hearts popped out and cut it to the shape I wanted as shown above.  I laid the stencil over my paper and taped it down with Washi tape to keep it secure.  Next I selected different colored heart shapes, applied some glue and set them in their, perfectly lined up, spots within my tenplate!  Next I carefully removed the template and as you can see in my first picture I was left with perfectly lined up heart shapes.  I ran that through my Big Shot and embossed it with a lovely quilt like folder by Anna Griffin for Cuttlebug. I did some cs layering, added a PTI sentiment called "Fillable Frames #4" on Spellbinders dies and finally embellished my plain white ribbon with a pearl.


5" square card
When I saw the resulting  "template" that this gray paper made I knew I had to use it layered over white paper!! So this time instead of filling the heart shapes I left them unfilled allowing the white cs to simply show through.  I love this look too.  I ran this one through the same embossing folder and it also looks very much like a quilt only slightly different than the first one. I added a sentiment, cut from a Spellbinders die, from the same PTI sentiment stamp set.  I used a Silver Leafing Pen by Krylon around the edges of the sentiment and finally three itty bitty pears on my solid white ribbon.


 Anyone who knows me knows how much I love the products at Papertrey Ink! This is one of the reasons why.  Not only do they give you wonderful ideas as to how to use their products they offer "continuing education" with the Make it Monday challenges!  There is still time!! why not join the fun...there is a prize!!

 Thank you so much for stopping by to cheer me on in my personal challenge to make 100 cards in 100 days Challenge : ) So far so good - six down down!! 94 to go!!

I hope you are enjoying your day and getting inky : )

(((Hugs)))
Patti


Wednesday, April 9, 2014

Get Well Soon!

BLOG CANDY!! see this post for more information!  All you need to do to qualify for a chance to win is to comment on this post!

Before I start my post for today I would like to welcome my newest follower, Kim M from Art Keeps me Sane blog.  I love her CAS style!! Please visit her blog and tell her Patti sent you! : )


 I created my cards, last night for today whew! I'm gonna get this! LOL, for the Mojo Monday Challenge this week.  I knew as soon as I saw the sketch this was what I wanted to do but.... it didn't occur to me it would look like Sadie here was falling over backward! LOL 


I have been trying to learn some more advanced techniques for coloring with my colored pencils and Gamsol.  I did a search to find out which pencils would work best for dark completions.  It is harder than I thought it would be.  She was looking either jaundice or like the self-tanning lotion had burst on her face! (remember that stuff?)  This link will take you to Mo's Digital Pencil you can see what Sadie is supposed to look like! : )


I actually colored three images but made two cards.  One is for my good friend who has recently had surgery and the other I decided to keep for my stash for future coloring comparisons. I hope I will improve but I think I need more than U-Tube can give me. There are several artists in my family surely someone can help me! heehee 

So!! did you notice anything different about me in the past two days???  I will give you a hint!

Lisa is amazing and I HIGHLY recomend her.  She is so sweet and super talented and FAST!! Please go see Lisa and if you decide to update your watermark I hope you will tell her Patti sent you!

Thank you so much for stopping by to cheer me on!! I am having a good time! feeling confident and trying to plan ahead! Four down!! 96 to go!!

Have a wonderful day! I will see you tomorrow : )

Patti